Callback
Table of Contents
What is Callback?
As per the English dictionary, Callback definition is ‘a return call‘
What is SystemVerilog Callback?
SystemVerilog callback specifies the rules to define the methods and placing method calls to achieve ‘a return call to methods’.
In simple words,
Callbacks are empty methods with a call to them.
or
A method of the class is implemented with calls to dummy methods. On a need basis, the user can extend the class and implement the dummy methods.
Where,
Dummy methods are callback methods
Calls to dummy methods are callback hooks
Note:
There won’t be any impact for not implementing the Callback methods.
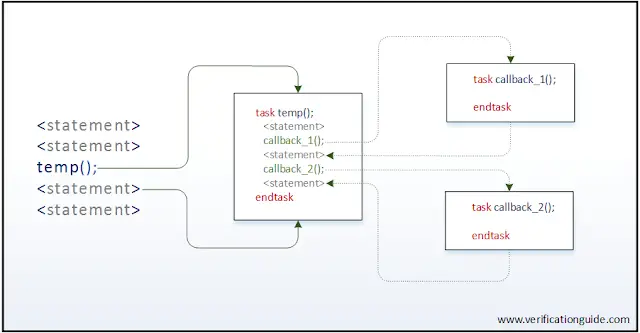
How callback works?

In the above diagram,
temp()is the method call to invoke a method temp- method temp has few statements (logic) also calls to callback_1 and callback_2
- callback_1 and callback_2 are dummy methods without any logic in it.
- On calling
callback_1()andcallback_2()there won’t be any impact to regular logic - On a need basis, the user can extend the class and add required logic to callback_1 and callback_2 without modifying the method temp
“randomize” is one of the SystemVerilog builtin methods which has the callback features implemented in it.
randomize method is implemented with the callback features to enable the execution of pre_randomize() and post_randomize() methods before and after the randomize() method execution respectively.
This is done by placing the callback hooks to pre_randomize() and post_randomize() methods in it.
Methods will get executed in the order mentioned below,
- pre_randomize();
- randomize();
- pre_randomize();
If required user can implement the pre_randomize() and post_randomize() methods.
How to implement callback?
Below is one of the ways to implement the SystemVerilog callback.
- Write a method which has calls (callback hooks) to dummy methods
- Write dummy callback methods
How to use callback?
- Extend the class and implement the callback method
- Override the existing class by extended class
Callback example
Let’s consider an example of a Slave Driver (Slave Driver: drives response to the master).
For simplicity, one callback hook is implemented and only response generation logic is captured in the code.
Components of slave_driver example are,
- slave_driver – Normal driver to drive response
- response types are OKAY, EXOKAY, SLVERR, DECERR
- slave_driver is constrained to send OKAY response always to see to the callback usage difference
- slave_env – Environment which has a slave driver created in it
- basic_test – Which sends the normal response
- error_test – Testcase with callback method used to generate an error response
- err_inject – extended driver class to implement the callback method

By using a callback, will implement the testcase to drive SLVERR response.
Will see though the below steps,
- Adding Callback Support
- Implementing Callback Method
- Using Callback
Adding Callback Support
In this step, will write the driver with a dummy method and callback hooks to it.
- Writing slave_driver class with enum variable resp
typedef enum {OKAY, EXOKAY, SLVERR, DECERR} resp_type;

class slave_driver;
  resp_type resp;
endclass
- Adding response driving task send_response with response randomize logic
typedef enum {OKAY, EXOKAY, SLVERR, DECERR} resp_type;

class slave_driver;
  resp_type resp;

  //send response task
  task send_response;
    std::randomize(resp) with { resp == OKAY;};
  endtask
endclass
- Defining the callback method by declaring the virtual task update_resp
typedef enum {OKAY, EXOKAY, SLVERR, DECERR} resp_type;

class slave_driver;
  resp_type resp;

  //callback hook
  virtual task update_resp; endtask

  //send response task
  task send_response;
    std::randomize(resp) with { resp == OKAY;};
  endtask
endclass
- Placing hook for callback. In this example, as it is required to change the response once it is generated, so it is good to place callback hook after calling the randomize method
typedef enum {OKAY, EXOKAY, SLVERR, DECERR} resp_type;

class slave_driver;
  resp_type resp;

  //callback hook
  virtual task update_resp; endtask

  //send response task
  task send_response;
    std::randomize(resp) with { resp == OKAY;};
    update_resp();
  endtask
endclass
Implementing Callback Method
For error response generation scenario, it is required to corrupt the response generated.
This can be achieved by adding the logic in update_resp() callback to overwrite the response generated.
Which involves below steps.
- extend the slave_driver and write new driver err_inject
class err_inject extends slave_driver;

endclass
- Implement the callback method update_resp
class err_inject extends slave_driver;
  virtual task update_resp;
    $display("Injecting SLVERR");
    resp = SLVERR;
  endtask
endclass
Using Callback
A callback can be used by,
- Writing new error response testcase
program error_test;
  slave_env  env;

  initial begin
    //Create env
    env = new();
    //Calling run of env
    env.run();
  end
endprogram
- Declare and create an err_inject driver
program error_test;
  slave_env  env;
  err_inject err_driver;

  initial begin
    //Create env
    env = new();
    err_driver = new();

    //Calling run of env
    env.run();
  end
endprogram
- Override the slave_driver by the new err_inject driver
program error_test;
  slave_env  env;
  err_inject err_driver;

  initial begin
    //Create env
    env = new();
    err_driver = new();
    //Overriding slave_driver by error_driver
    env.slv_driver = err_driver;

    //Calling run of env
    env.run();
  end
endprogram
Simulator Output of basic_test
Slave generated response is OKAY
Slave generated response is OKAY
Simulator of error_test
Injecting SLVERR
Slave generated response is SLVERR
Injecting SLVERR
Slave generated response is SLVERR
Note:
- To execute basic_test comment error_test.sv
- To execute error_test comment basic_test.sv
Benefits of callback?
By looking into the above slave_driver examples we could say that without modifying the existing environment it is possible to achieve error injection.
- Easy to add additional functionality to existing logic
- Makes component reusable
