Randomize Variable in SystemVerilog

How to randomize a variable in SystemVerilog?

SystemVerilog provides multiple methods to generate random data. By using any of these methods a variable can be randomized.

Systemverilog randomization methods

  • $urandom( ) and $random( )
  • $urandom_range( )
  • std::randomize():
  • randomize():

$urandom( ) and $random( )

The $urandom( ) function returns a new 32-bit random number

variable = $urandom(seed); //seed is an optional argument

$random() is same as $urandom() but it generates signed numbers

$urandom_range( )

The $urandom_range() function returns an unsigned integer within a specified range.

variable = $urandom_range( int unsigned maxval, int unsigned minval = 0 );

Below example shows the usage of urandom and urandom_range.

module system_funcations;
  bit [31:0] addr1;
  bit [31:0] addr2;
  bit [64:0] addr3;
  bit [31:0] data;
  initial begin
    addr1 = $urandom();
    addr2 = $urandom(89);
    addr3 = {$urandom(),$urandom()};
    data  = $urandom * 6;

    $display("addr1=%0d, addr2=%0d, addr3=%0d, data=%0d",addr1,addr2,addr3,data);
 
    addr1 = $urandom_range(30,20);
    addr2 = $urandom_range(20); //takes max value as '0'
    addr3 = $urandom_range(20,30); //considers max value as '30' and min value as '20'
    $display("addr1=%0d, addr2=%0d, addr3=%0d",addr1,addr2,addr3);
  end
endmodule

Simulator Output

addr1=303379748, addr2=2153631232, addr3=423959822444962108, data=546103870
addr1=27, addr2=6, addr3=25

Click to execute on   

std::randomize():

Variables can be randomized by using std::randomize method. It can accept the inline constraints using the “with” clause.

std::randomize (variable);

Can also be used as below,

std::randomize (variable);
std::randomize (variable) with { constraint's; };

std::randomize (variable-1, variable-2 ... variable-n);
std::randomize (variable-1, variable-2 ... variable-n) with { constraint's; };

Below example shows the usage of std::randomize().

program std_randomize;
  bit [07:0] addr;
  bit [31:0] data;
  bit [63:0] data_x_4;
  

  initial begin
    std::randomize(addr);
    
    $display("Value of addr is %h",addr);
    std::randomize(data,data_x_4) with { data     == addr * 8; 
                                         data_x_4 == data * 4;   
                                     };
    
    $display("Value of data is %0d",data);
    $display("Value of data_x_4 is %0d",data_x_4);
  end
endprogram

Simulator Output

Value of addr is 36
Value of data is 432
Value of data_x_4 is 1728

Click to execute on   

randomize():

This method is used to randomize class fields declared with rand/randc. It can accept inline constraints using the “with” clause in addition to the constraints defined in a class context.

refer Randomization and Constraints for detailed description and examples of randomize() method.

❮ Previous Next ❯

SystemVerilog Coverage Average grade vs Covered

Average grade vs Overall Covered Coverage

While doing code coverage analysis, in the coverage tool we see two numbers,
one saying Overall Average Grade and Overall covered.

what is the difference between these two numbers?

Let’s see with one Code Coverage analysis example.

Consider Block and Expression coverage analysis for a design,

Assuming it consists of 73 blocks and
85 expressions.

Considering 69/73 blocks covered.
74/85 expressions covered.

so,
Block Coverage          is 69/73 = 94.52%
Expression Coverage is 74/85 = 87.06%

Overall Average Grade = (Block Coverage + Expression Coverage) / 2;
= (94.52 + 87.06) / 2 = 90.79%

Overall covered = (No. of blocks covered + No. of expressions covered) / (No. of blocks + No. of expressions)
= (69+74) / (73+85) = 143/158 = 90.51%

Overall Average Grade = 90.79%
Overall covered            = 90.51%

SystemVerilog Class Assignment

Class Assignment

Object will be created only after doing new to an class handle,

 packet   pkt_1;
 pkt_1  = new();
 packet   pkt_2;
 pkt_2  = pkt_1;

In the above piece of code,

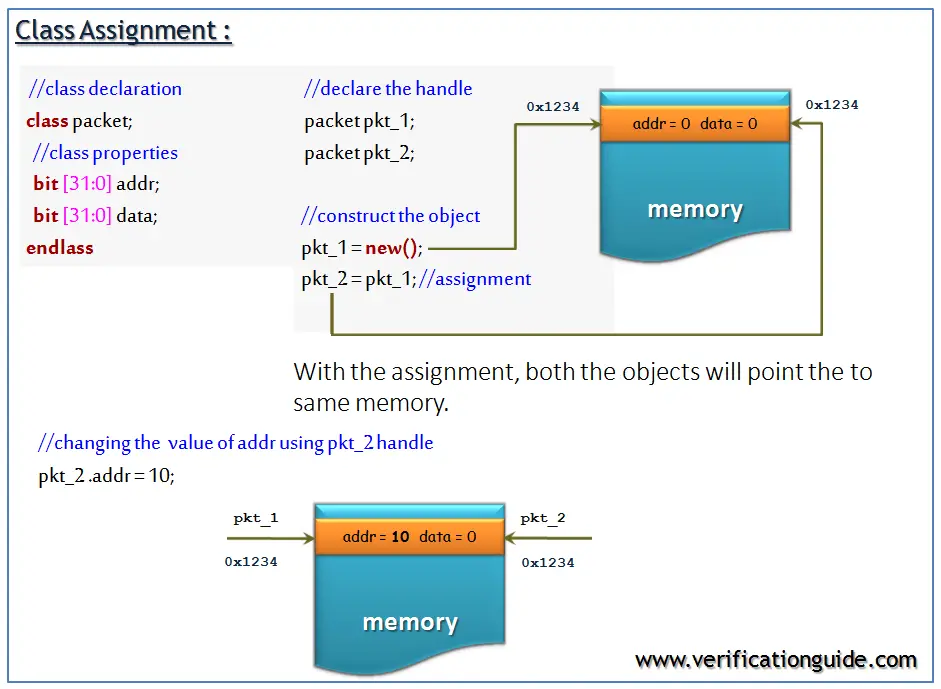
  • an object is created only for pkt_1, pkt_2 is just a handle to the packet
  • pkt_1 is assigned to the pkt_2. so only one object has been created, pkt_1 and pkt_2 are two handles both are pointing to the same object
  • As both the handles are pointing to the same object any changes made with respect to pkt_1 will reflect on pkt_2
SystemVerilog Class Assignment

Class assignment example

The below example shows an assigning the object handle to another handle and accessing class properties with it.

class packet;
  //class properties
  bit [31:0] addr;
  bit [31:0] data;
  bit write;
  string pkt_type;
  //constructor
  function new();
    addr  = 32'h10;
    data  = 32'hFF;
    write = 1;
    pkt_type = "GOOD_PKT";
  endfunction

  //method to display class properties
  function void display();
    $display("---------------------------------------------------------");
    $display("\t addr  = %0d",addr);
    $display("\t data  = %0h",data);
    $display("\t write = %0d",write);
    $display("\t pkt_type  = %0s",pkt_type);
    $display("---------------------------------------------------------");
  endfunction
endclass

module class_assignment;
  packet pkt_1;
  packet pkt_2;

  initial begin
    pkt_1 = new();
    $display("\t****  calling pkt_1 display  ****");
    pkt_1.display();
    //assigning pkt_1 to pkt_2
    pkt_2 = pkt_1;
    $display("\t****  calling pkt_2 display  ****");
    pkt_2.display();
    //changing values with pkt_2 handle
    pkt_2.addr = 32'hAB;
    pkt_2.pkt_type = "BAD_PKT";

    //changes made with pkt_2 handle will reflect on pkt_1
    $display("\t****  calling pkt_1 display  ****");
    pkt_1.display();
  end
endmodule

Simulator Output

 ****calling pkt_1 display****
---------------------------------------------------------
addr = 16
data = ff
write = 1
pkt_type = GOOD_PKT
---------------------------------------------------------
****calling pkt_2 display****
---------------------------------------------------------
addr = 16
data = ff
write = 1
pkt_type = GOOD_PKT
---------------------------------------------------------
****calling pkt_1 display****
---------------------------------------------------------
addr = 171
data = ff
write = 1
pkt_type = BAD_PKT
---------------------------------------------------------

Click to execute on

❮ Previous Next ❯

Packed and Unpacked array

Packed and Unpacked array in SystemVerilog

  • The term packed array is used to refer to the dimensions declared before the data identifier name
  • The term unpacked array is used to refer to the dimensions declared after the data identifier name
bit [7:0] temp_var; // packed array of bit types
bit temp_var [7:0]; // unpacked array of real types

Packed array

  • Packed arrays can be of single bit data types (reg, logic, bit), enumerated types, and recursively packed arrays and packed structures
  • One dimensional packed array is referred to as a vector
    • Vector: A vector is a multi-bit data object of reg/logic/bit declared by specifying a range
    • Scalar: Scalar is 1-bit data object of reg/logic/bit declared without specifying a range
  • A packed array is a mechanism for subdividing a vector into sub-fields, which can be conveniently accessed as array elements.
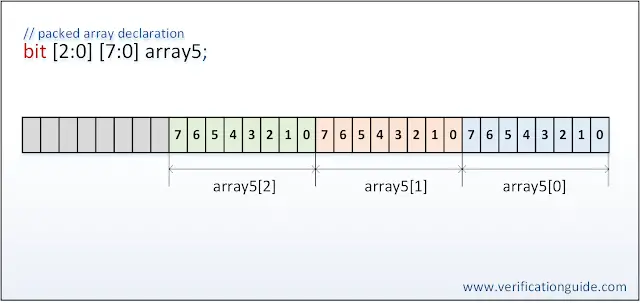
  • A packed array is guaranteed to be represented as a contiguous set of bits.

Packed array example

bit [2:0] [7:0] array5;

The below diagram shows storing packed array as a contiguous set of bits.

SystemVerilog Packed Array

UnPacked array

  • Unpacked arrays can be of any data type.
  • Unpacked arrays shall be declared by specifying the element ranges after the identifier name.
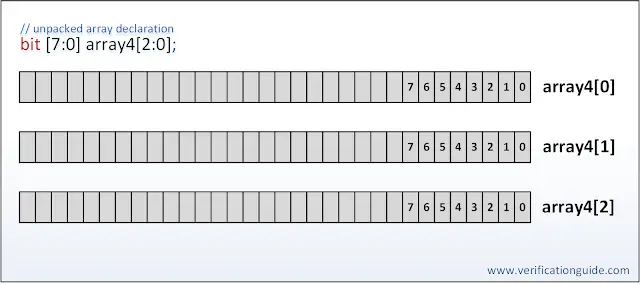
  • An unpacked array may or may not be so represented as a contiguous set of bits.

Unpacked array example

bit [7:0] array4[2:0];

Below diagram shows storing unpacked array as a non-contiguous set of bits.

SystemVerilog Unpacked array

❮ Previous Next ❯

Systemverilog Dynamic Array

Dynamic Array

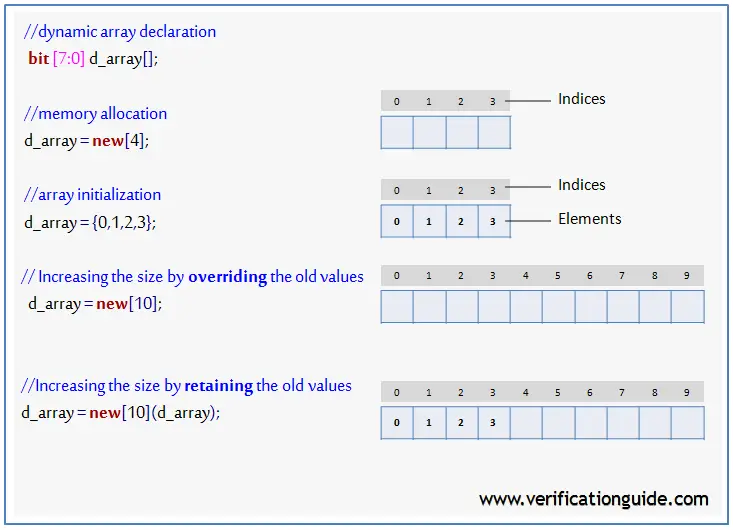
A dynamic array is one dimension of an unpacked array whose size can be set or changed at run-time. Dynamic array is Declared using an empty word subscript [ ].

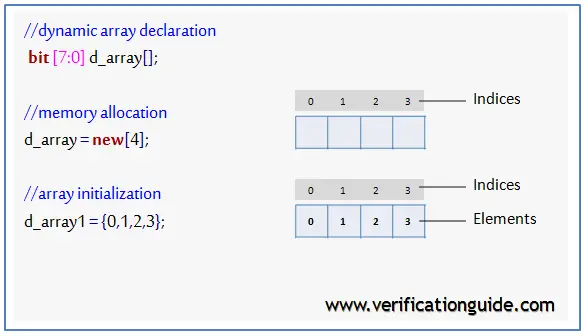
The space for a dynamic array doesn’t exist until the array is explicitly created at run-time, space is allocated when new[number] is called. the number indicates the number of space/elements to be allocated.

Dynamic array Syntax

data_type array_name [ ];

data_type is the data type of the array elements.

Dynamic array methods

new[ ]    –> allocates the storage.
size( )    –> returns the current size of a dynamic array.
delete( ) –> empties the array, resulting in a zero-sized array.

Example:

//declaration
bit [7:0] d_array1[ ];
int d_array2[ ];

//memory allocation
d_array1 = new[4]; //dynamic array of 4 elements
d_array2 = new[6]; //dynamic array of 6 elements

//array initialization
d_array1 = {0,1,2,3};
foreach(d_array2[j]) d_array2[j] = j;
SystemVerilog Dynamic array

resize the dynamic array

//Change the length of the array after declaration/initialization
d_array1 = new[10]; //dynamic array of 10 elements

In the above syntax, d_array1 will get allotted with 10 new memory locations and old values of d_array1 will get deleted. old values of d_array1 elements can be retained by extending the current array by using the below syntax.

//Allocate 6 new elements and retain values of 4 elements.
d_array1 = new[10](d_array1);
SystemVerilog Dynamic Array resize

Delete the dynamic array

//delete array
d_array1.delete;

array_name.delete() method will delete the array.

Dynamic array examples

Dynamic Array Declaration, Allocation and Initialization.

module dynamic_array;
  //dynamic array declaration
  bit [7:0] d_array1[];
  int       d_array2[];

  initial begin
    $display("Before Memory Allocation");
    $display("\tSize of d_array1 %0d",d_array1.size());
    $display("\tSize of d_array2 %0d",d_array2.size());

    //memory allocation
    d_array1 = new[4]; 
    d_array2 = new[6]; 
    
    $display("After Memory Allocation");
    $display("\tSize of d_array1 %0d",d_array1.size());
    $display("\tSize of d_array2 %0d",d_array2.size());
    
    //array initialization
    d_array1 = {0,1,2,3};
    foreach(d_array2[j])  d_array2[j] = j;

    $display("--- d_array1 Values are ---");
    foreach(d_array1[i])   $display("\td_aaray1[%0d] = %0d",i, d_array1[i]);
    $display("---------------------------------");

    $display("--- d_array2 Values are ---");
    foreach(d_array2[i])   $display("\td_aaray2[%0d] = %0d",i, d_array2[i]);
    $display("---------------------------------");
  end

endmodule

Simulator Output:

Before Memory Allocation
Size of d_array1 0
Size of d_array2 0
After Memory Allocation
Size of d_array1 4
Size of d_array2 6
--- d_array1 Values are ---
d_aaray1[0] = 0
d_aaray1[1] = 1
d_aaray1[2] = 2
d_aaray1[3] = 3
---------------------------------
--- d_array2 Values are ---
d_aaray2[0] = 0
d_aaray2[1] = 1
d_aaray2[2] = 2
d_aaray2[3] = 3
d_aaray2[4] = 4
d_aaray2[5] = 5
---------------------------------

Click to execute on   

Dynamic Array delete method

module dynamic_array;
  
  //dynamic array declaration
  bit [7:0] d_array1[];
  int       d_array2[];

  initial begin
    //memory allocation
    d_array1 = new[2]; 
    d_array2 = new[3]; 
        
    //array initialization
    d_array1 = {2,3};
    foreach(d_array2[j])  d_array2[j] = j;

    $display("--- d_array1 Values are ---");
    foreach(d_array1[i])   $display("\td_aaray1[%0d] = %0d",i, d_array1[i]);
    $display("---------------------------------");

    $display("--- d_array2 Values are ---");
    foreach(d_array2[i])   $display("\td_aaray2[%0d] = %0d",i, d_array2[i]);
    $display("---------------------------------");
    
    //delete array
    d_array1.delete;
    d_array2.delete;
    
    $display("After Array Delete");
    $display("\tSize of d_array1 %0d",d_array1.size());
    $display("\tSize of d_array2 %0d",d_array2.size());
  end
endmodule

Simulator Output:

--- d_array1 Values are ---
d_aaray1[0] = 2
d_aaray1[1] = 3
---------------------------------
--- d_array2 Values are ---
d_aaray2[0] = 0
d_aaray2[1] = 1
d_aaray2[2] = 2
---------------------------------
After Array Delete
Size of d_array1 0
Size of d_array2 0

Click to execute on   

resizing dynamic array

The below example shows the increasing dynamic array size by overriding and retaining old values.

module dynamic_array;
  
  //dynamic array declaration
  bit [7:0] d_array1[];
  int       d_array2[];

  initial begin
    //memory allocation
    d_array1 = new[2]; 
    d_array2 = new[3]; 
        
    //array initialization
    d_array1 = {2,3};
    foreach(d_array2[j])  d_array2[j] = j;

    $display("----- d_array1 Values are -----");
    foreach(d_array1[i])   $display("\td_aaray1[%0d] = %0d",i, d_array1[i]);

    $display("----- d_array2 Values are -----");
    foreach(d_array2[i])   $display("\td_aaray2[%0d] = %0d",i, d_array2[i]);
    
    //Increasing the size by overriding the old values 
    d_array1 = new[4]; //Create dynamic array of 4 elements
    $display("Size of Array d_array1 %0d",d_array1.size());
    $display("----- d_array1 Values are -----");
    foreach(d_array1[i])   $display("\td_aaray1[%0d] = %0d",i, d_array1[i]);

    //Increasing the size by retaining the old values 
    d_array2 = new[5](d_array2); //Create dynamic array of 5 elements, retaining old values 
    $display("Size of Array d_array2 %0d",d_array2.size());
    $display("----- d_array2 Values are -----");
    foreach(d_array2[i])   $display("\td_aaray2[%0d] = %0d",i, d_array2[i]);
    
  end
endmodule

Simulator Output:

----- d_array1 Values are -----
d_aaray1[0] = 2
d_aaray1[1] = 3
----- d_array2 Values are -----
d_aaray2[0] = 0
d_aaray2[1] = 1
d_aaray2[2] = 2
Size of Array d_array1 4
----- d_array1 Values are -----
d_aaray1[0] = 0
d_aaray1[1] = 0
d_aaray1[2] = 0
d_aaray1[3] = 0
Size of Array d_array2 5
----- d_array2 Values are -----
d_aaray2[0] = 0
d_aaray2[1] = 1
d_aaray2[2] = 2
d_aaray2[3] = 0
d_aaray2[4] = 0

Click to execute on   

❮ Previous Next ❯

Systemverilog Fixedsize Array

Array in SystemVerilog

Array

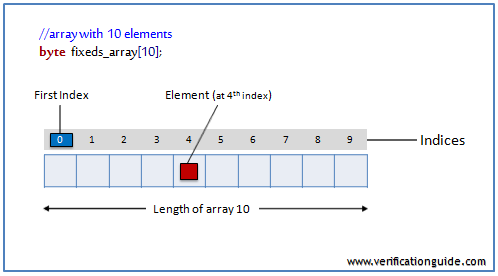
An array is a collection of variables, all of the same type, and accessed using the same name plus one or more indices. there are different types of arrays, few array declaration examples are given below.

int array1 [6];            //fixed size single dimension array
int array2 [5:0];          //fixed size single dimension array
int array3 [3:0][2:0];     //fixed size multi dimension array
bit [7:0] array4[2:0];     //unpacked array declaration
bit [2:0][7:0] array5;     //packed array declaration
bit [2:0][7:0] array6 [3]; //mixed packed and unpacked array
SystemVerilog FIxed Size array

In SystemVerilog vector width/dimensions declared before the object name is referred to as packed array and array size/dimensions declared after the object name is referred to as an unpacked array.

A packed array is a mechanism for subdividing a vector into sub-fields which can be conveniently accessed as array elements.

Fixed size array

In fixed size array, array size will be constant throughout the simulation, Once the array is declared no need to create it. By default, the array will be initialized with value ‘0’.

Single dimensional array

int array1 [6];   //Compact declaration
int array2 [5:0]; // Verbose declaration

Multidimensional array

Multidimensional arrays are also known as an array of arrays.

Two-dimensional arraY

int arr[2][3];

This array has total 2*3 = 6 elements.

Three-dimensional array

int arr[2][2][2];

This array has total 2*2*2 = 8 elements.

Two-dimensional array declaration

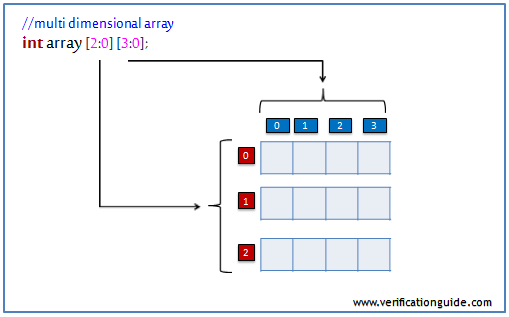
int array3 [2:0][3:0];

The data in a two-dimensional array is stored in a tabular form as shown in the below diagram.

SystemVerilog Multidimensional array

array assignment

array1 = '{0,1,2,3,4,5};
array2 = '{0,1,2,3,4,5};
array3 = '{ '{0,1,2,3},'{4,5,6,7},'{8,9,10,11}};

Fixed Size Array Example

This example shows array declaration and array manipulation using for and foreach loop.

module fixedsize_array;
  //declaration of array’s
  int array1[6];               //single dimension array
  int array2[5:0];             //single dimension array
  int array3[2:0][3:0];        //multi dimension array
  int array4[4:0];

  initial begin
    //array initialization
    array1 = '{0,1,2,3,4,5};
    array2 = '{0,1,2,3,4,5};
    array3 = '{'{0,1,2,3},'{4,5,6,7},'{8,9,10,11}};

    //displaying array elements
    $display("-------displaying array1-------");
    foreach(array1[i]) $display("\t array1[%0d] = %0d",i,array1[i]);

    $display("-------displaying array2-------");
    for(int i=0;i<6;i++) $display("\t array2[%0d] = %0d",i,array2[i]);

    $display("-------displaying array3-------");
    foreach(array3[i,j]) $display("\t array3[%0d][%0d] = %0d",i,j,array3[i][j]);

    $display("-------displaying uninitialized array4-------");
    for(int i=0;i<5;i++) $display("\t array4[%0d] = %0d",i,array4[i]);
  end
endmodule

Simulator Output:

-------displaying array1-------
array1[0] = 0
array1[1] = 1
array1[2] = 2
array1[3] = 3
array1[4] = 4
array1[5] = 5
-------displaying array2-------
array2[0] = 5
array2[1] = 4
array2[2] = 3
array2[3] = 2
array2[4] = 1
array2[5] = 0
-------displaying array3-------
array3[2][3] = 0
array3[2][2] = 1
array3[2][1] = 2
array3[2][0] = 3
array3[1][3] = 4
array3[1][2] = 5
array3[1][1] = 6
array3[1][0] = 7
array3[0][3] = 8
array3[0][2] = 9
array3[0][1] = 10
array3[0][0] = 11
-------displaying uninitialized array4-------
array4[0] = 0
array4[1] = 0
array4[2] = 0
array4[3] = 0
array4[4] = 0

Click to execute on   

❮ Previous Next ❯

SystemVerilog Parameters and `define

SystemVerilog Parameters

There are two ways to define constants:

  • parameter
  • `define

Parameter

Parameters must be defined within module boundaries using the keyword parameter.

A parameter is a constant that is local to a module that can optionally be redefined on an instance. Parameters are typically used to specify the width of variables and time delays.

Parameter example

module mem_model #(
 parameter ADDR_WIDTH=8;
 parameter DATA_WIDTH=32;)
 (clk, addr, data);

 input  clk;
 input  [ADDR_WIDTH-1:0] addr;
 output [DATA_WIDTH-1:0] data;
 .....
 .....
endmodule

Parameter redefinition

Parameter values are not allowed to modify at runtime but can be modified using the defparam statement and #delay specification with module instantiation.

//Creates mem_1 instance with default addr and data widths.
mem_model mem_1 (.clk(clk),
                 .addr(addr_1),
                 .data(data_1));

//Creates mem_2 instance with addr width = 4 and data width = 8.
mem_model #(4,8) mem_2 (.clk(clk),
                        .addr(addr_2),
                        .data(data_2));

//Creates mem_3 instance with addr width = 32 and data width = 64.
mem_model #(32,64) mem_3 (.clk(clk),
                          .addr(addr_3),
                          .data(data_3));

//Creates mem_4 instance with default addr width and data width = 64.
mem_model #(DATA_WIDTH=64) mem_4 (.clk(clk),
                                 .addr(addr_3),
                                 .data(data_3));

//ADDR_WIDTH value of mem_1 instance can be changed by using defparam as shown below,
defparam hierarchical_path.mem_1.ADDR_WIDTH = 32;

`define Macro

The `define compiler directive is used to perform global macro substitution and remain active for all files read/compiled after the macro definition.

It will available until another macro definition changes the value or until the macro is undefined using the `undef compiler directive.

`define WIDTH 8
to avoid redefincation `ifdef can be used,

`ifdef WIDTH
 // do nothing (better to use `ifndef)
`else
 `define WIDTH 8
`endif

`ifndef WIDTH
 `define WIDTH 8
`endif

`ifdef can be used as if..else

 `ifdef TYPE_1
   `define WIDTH 8
`else
 `define WIDTH 32
`endif

//`ifdef can also be used to avoid redefining/recompiling the module/class,
//In the below example, 
//definition of MODULE_1 is checked, if it is not defined then MODULE_1 will be defined and compiles the module/class inside the `ifndef - `endif.
//suppose if the same file is compiled twice then at the first time MODULE_1 will get defined, so second time `ifndef condition will not be satisfied. 
`ifndef MODULE_1
`define MODULE_1
module mem;
   ....
   ....
endmodule
`endif

❮ Previous Next ❯

SystemVerilog Coverage Options

Coverage options

Coverage options control the behavior of the covergroup, coverpoint, and cross.

at_least

A minimum number of hits for each bin. A bin with a hit count that is less than the number is not considered covered. the default value is ‘1’.

auto_bin_max

A maximum number of automatically created bins when no bins are explicitly defined for a coverpoint. the default value is ‘64’.

cross_auto_bin_max

A maximum number of automatically created cross product bins for a cross. there is no default value, it is unbounded.

Coverage options can be used as below,

covergroup cg @(posedge clk);
  c1: coverpoint addr  { option.auto_bin_max = 128;}
  c2: coverpoint wr_rd { option.atleast = 2;}
  c1Xc2: cross c1, c2  { option.cross_auto_bin_max = 128;}
endgroup : cg

❮ Previous Next ❯

SystemVerilog Cross Coverage

Cross Coverage

Cross Coverage is specified between the cover points or variables. Cross coverage is specified using the cross construct.

Expressions cannot be used directly in a cross; a coverage point must be explicitly defined first.

Cross coverage by cover_point name

bit [3:0] a, b;
covergroup cg @(posedge clk);
  c1: coverpoint a;
  c2: coverpoint b;
  c1Xc2: cross c1,c2;
endgroup : cg

Cross coverage by the variable name

bit [3:0] a, b;
covergroup cov @(posedge clk);
  aXb : cross a, b;
endgroup

In the above example, each coverage point has 16 bins, namely auto[0]…auto[15]. The cross of a and b (labeled aXb), therefore, has 256 cross products, and each cross product is a bin of aXb.

Cross coverage between variable and expression

bit [3:0] a, b, c;
covergroup cov @(posedge clk);
  BC  : coverpoint b+c;
  aXb : cross a, BC;
endgroup

The coverage group cov has the same number of cross products as the previous example, but in this case, one of the coverage points is the expression b+c, which is labeled BC.
❮ Previous Next ❯

SystemVerilog Functional Coverage

Functional Coverage

Functional coverage is a user-defined metric that measures how much of the design specification has been exercised in verification.

Defining the coverage model

The coverage model is defined using Covergroup construct.

The covergroup construct is a user-defined type. The type definition is written once, and multiple instances of that type can be created in different contexts.

Similar to a class, once defined, a covergroup instance can be created via the new()operator. A covergroup can be defined in a module, program, interface, or class.

Each covergroup specification can include,

  • A clocking event that synchronizes the sampling of coverage points
  • A set of coverage points
  • Cross coverage between coverage points
  • Optional formal arguments
  • Coverage options

Functional Coverage example

Example-1

covergroup cov_grp @(posedge clk);
  cov_p1: coverpoint a;
endgroup

cov_grp cov_inst = new();

Example-2

covergroup cov_grp;
  cov_p1: coverpoint a;
endgroup

cov_grp cov_inst = new();
@(abc) cov_inst.sample();

In the example-1 clocking, event specifies the event at which coverage points are sampled.
In the example-2 coverage, sampling is triggered by calling a built-in sample() method.

Defining coverage points

A covergroup can contain one or more coverage points. A coverage point can be an integral variable or an integral expression. Each coverage point is associated with “bin”.On each sample clock simulator will increment the associated bin value.

The bins will automatically be created or can be explicitly defined.

Automatic Bins or Implicit Bins

An automatically single bin will be created for each value of the coverpoint variable range. These are called automatic, or implicit, bins.

For an “n” bit integral coverpoint variable, a 2^n number of automatic bins will get created.

module cov;
  logic       clk;
  logic [7:0] addr;
  logic       wr_rd;

  covergroup cg @(posedge clk);
    c1: coverpoint addr;
    c2: coverpoint wr_rd;
  endgroup : cg
  cg cover_inst = new();
  ...
endmodule

Below are the bins, will get created automatically,
for addr: c1.auto[0] c1.auto[1] c1.auto[2] … c1.auto[255]
for wr_rd: c2.auto[0]

Explicit bins

“bins” keyword is used to declare the bins explicitly to a variable.

A separate bin is created for each value in the given range of variable or a single/multiple bins for the rage of values.
Bins are explicitly declared within curly braces { } along with the bins keyword followed by bin name and variable value/range, immediately after the coverpoint identifier.

Example on Bins Declaration,

module cov;
  logic       clk;
  logic [7:0] addr;
  logic       wr_rd;

  covergroup cg @(posedge clk);
    c1: coverpoint addr { bins b1 = {0,2,7};
                        bins b2[3] = {11:20};
                        bins b3   = {[30:40],[50:60],77};                        
                        bins b4[] = {[79:99],[110:130],140};
                        bins b5[] = {160,170,180};
                        bins b6    = {200:$};
                        bins b7 = default;}
    c2: coverpoint wr_rd {bins wrrd};
  endgroup : cg
  
  cg cover_inst = new();
  ...
endmodule
bins b1    = {0,2,7 };               //bin “b1” increments for addr = 0,2 or 7
bins b2[3] = {11:20};                //creates three bins b2[0],b2[1] and b2[3].and The 11 possible values are 
                                     //distributed as follows: (11,12,13),(14,15,16) and (17,18,19,20) respectively.
bins b3    = {[30:40],[50:60],77};   //bin “b3” increments for addr = 30-40 or 50-60 or 77
bins b4[]  = {[79:99],[110:130],140};//creates three bins b4[0],b4[1] and b4[3] with values 79-99,50-60 and 77 respectively
bins b5[]  = {160,170,180};          //creates three bins b5[0],b5[1] and b5[3] with values 160,170 and 180 respectively
bins b6    = {200:$};                //bin “b6” increments for addr = 200 to max value i.e, 255.
default bin;                         // catches the values of the coverage point that do not lie within any of the defined bins.

bins for transitions

The transition of coverage point can be covered by specifying the sequence,

value1 => value2

It represents transition of coverage point value from value1 to value2.

sequence can be single value or range,

value1 => value2 => value3 ….

range_list_1 => range_list_2

Example,

covergroup cg @(posedge clk);
  c1: coverpoint addr{ bins b1   = (10=>20=>30);
                       bins b2[] = (40=>50),(80=>90=>100=>120);
                       bins b3   = (1,5 => 6, 7);}
  c2: coverpoint wr_rd;
endgroup : cg

bins b1   = (10=>20=>30);                // transition from 10->20->30
bins b2[] = (40=>50),(80=>90=>100=>120); // b2[0] = 40->50 and b2[1] = 80->90->100->120
bins b3 = (1,5 => 6, 7);}                // b3 = 1=>6 or 1=>7 or 5=>6 or 5=>7

ignore_bins

A set of values or transitions associated with a coverage-point can be explicitly excluded from coverage by specifying them as ignore_bins.

covergroup cg @(posedge clk);
  c1: coverpoint addr{ ignore_bins b1 = {6,60,66};
                       ignore_bins b2 = (30=>20=>10); }
endgroup : cg

illegal_bins

A set of values or transitions associated with a coverage-point can be marked as illegal by specifying them as illegal_bins.

covergroup cg @(posedge clk);
  c1: coverpoint addr{ illegal_bins b1 = {7,70,77};
                       ignore_bins b2 = (7=>70=>77);}
endgroup : cg

❮ Previous Next ❯