SystemVerilog Datatypes

SystemVerilog Data Types

Structural Data Types

wire and reg

structural data types called nets, which model hardware connections between circuit components. The wire nets act like real wires in circuits. The reg type holds their values until another value is put on them, just like a register hardware component.

The declarations for wire and reg signals are inside a module but outside any initial or always block.

The initial state of a,

reg is x unknown, wire is z.

Behavioral Data Types

integer, real, and time

An integer declares one or more variables of type integer. These variables can hold values ranging from -2^31 to (2^31)-1.

Integer Syntax:

 integer integer_variable_name;

A real declaration declares one or more variables of type real. The real variables are stored as 64-bit quantities, and store the real values. Real numbers can be specified in either decimal notation (for example, 14.72) or in scientific notation (for example, 39e8).

Examples:

1.8 635.16

1.2E12 (the exponent symbol can be e or E)

1.30e-2

Syntax

real real_variable_name;

Default value of integer type variable is “x” and Default value of real type variable is “0”.

Examples:

integer a[0:64] ; // an array of 65 integer values

real float_v ; // a variable to store real value

Time

Time is a 64-bit quantity that can be used in conjunction with the $time system task to hold simulation time. Time is not supported for synthesis and hence is used only for simulation purposes.

Syntax

time time_variable_name;

Parameters

Parameters represent constants, hence it is illegal to modify their value at runtime. However, parameters can be modified at compilation time to have values that are different from those specified in the declaration assignment. This allows the customization of module instances. A parameter can be modified with the defparam statement, or in the module instance statement.

parameter size = 16 ;

logic

logic is the improved version of reg form Verilog to SystemVerilog, so it Can be driven by continuous assignments, gates, and modules in addition to being a variable. declaration:

                    bit                             – Unsigned
                    byte, shortint, int, longint    – Signed
                       unsigned two-state types,
                          bit            single_bit ;    // unsigned single bit
                          bit [31:0]     32_bit      ;    // 32-bit unsigned integer
                       signed two-state types,
                          int           integer;   // 32-bit signed integer
                          byte          8_bit  ;   //   8-bit signed integer
                          shortint      16_bit ;   // 16-bit signed integer
                          longint       64_bit ;   // 64-bit signed integer
                       unsigned from signed two-state types,
                           int           unsigned integer;   // 32-bit unsigned integer
                           byte          unsigned  8_bit;   //   8-bit unsigned integer
                           shortint      unsigned  16_bit;   // 16-bit unsigned integer
                           longint       unsigned  64_bit;   // 64-bit unsigned integer

Void Data Types

The void data type represents non-existent data. This type can be specified as the return type of functions, indicating no return value.

syntax:   
         void’(function_call());

String

A string data type is variable size, it is a dynamically allocated array of bytes.

        string declaration examples:
              string             s1    =   "Hellow World";
              string             s2    =   {"Hi"," ",s1};
              bit [31:0]         b      =   128;
              string             s3    =   b;      // sets 128 to s3
module string_datatype;
   //declaration
   string s1 = "Hello World";
   string s2 = {"Hi,"," ",s1};
   bit[31:0]b= 128;
   string s3 = b; // sets 128 to s3
 initial begin
     //display values
     $display("String 1 s1 = %0s",s1);
     $display("String 2 s2 = %0s",s2);
     $display("String 3 s3 = %0d bit b = %0d",s3,b);
   end
 endmodule

Simulator Output

String 1 s1 = Hello World
String 2 s2 = Hi, Hello World
String 3 s3 = 128 bit b = 128

Click to execute on

EVENT

SystemVerilog enhances the Verilog event in several ways. An event is now a handle to a synchronization object that can be passed around to routines. In Verilog, if the triggerin

g thread executes before the blocking thread, the trigger is missed. SystemVerilog introduces triggered function t­­­­­hat lets you check whether an event has been triggered.

event declaration examples,

          event  e1;
          event  e2;
          event  done;

A detailed explanation of events and Event operations are explained in later chapters(SystemVerilog Events).

User Defined

The user can define a new type using typedef, as in C. This can then be instantiated as,

                     integer_v var1;
                     integer_v var2;

❮ Previous Next ❯

SystemVerilog Parameterized Classes

Parameterized Classes

Parameterized classes are same as the parameterized modules in the verilog. parameters are like constants local to that particular class.
The parameter value can be used to define a set of attributes in class. default values can be overridden by passing a new set of parameters during instantiation. this is called parameter overriding.

//---- class ----
class packet #(parameter int ADDR_WIDTH = 32,DATA_WIDTH = 32);
  bit [ADDR_WIDTH-1:0] address;
  bit [DATA_WIDTH-1:0] data   ;

  function new();
    address = 10;
    data    = 20;
  endfunction
endclass

packet pkt;    –>   creates pkt handle with default ADDR_WIDTH and DATA_WIDTH values.
The default parameter value can be overridden when the class is instantiated.

packet #(32,64) pkt;  –> creates pkt handle with ADDR_WIDTH = 32 and DATA_WIDTH = 64.

Pass a data type to a class

class packet #(parameter type T = int);
  T address;
  T data   ;

  function new();
    address = 10;
    data    = 20;
  endfunction
endclass

packet pkt;                                    –>    address and data type is int
packet #(bit [31:0]) pkt; –>    address and data type is bit [31:0]
❮ Previous Next ❯

Systemverilog Data Hiding and Encapsulation

Data hiding and Encapsulation

The technique of hiding the data within the class and making it available only through the methods, is known as encapsulation.
Because it seals the data (and internal methods) safely inside the “capsule” of the class, where it can be accessed only by trusted users  (i.e., by the methods of the class).

Access Control

By default all the members and methods of a class are accessible from anywhere using the object handle, sometimes this could corrupt the class members values, which should not be touched at all.
Access control rules that restrict the members of a class from being used outside the class, this is achieved by prefixing the class members with the keywords,

  • local
  • protected

local class members

External access to the class members can be avoided by declaring members as local.
Any violation could result in a compilation error.

Syntax:

local integer x;

Local Class members examples

Accessing local variable outside the class ( Not allowed )

In below example,
The local variable declared inside the class is trying to access from outside the class by using object handle.
As the variable is declared as local, which leads to a compilation error.

class parent_class;
  local bit [31:0] tmp_addr;
  
  function new(bit [31:0] r_addr);
    tmp_addr = r_addr + 10;
  endfunction

  function display();
    $display("tmp_addr = %0d",tmp_addr);
  endfunction
endclass


//   module
module encapsulation;
  initial begin
    parent_class p_c = new(5);
       
    p_c.tmp_addr = 20;  //Accessing local variable outside the class
    p_c.display();
  end
endmodule

Simulator Output

Error- Illegal class variable access
testbench.sv,
Local member 'tmp_addr' of class 'parent_class' is not visible to scope
'encapsulation'.

Click to execute on

Accessing local variable within the class ( Allowed )

In the below example, The local variable declared inside the class is being accessed inside the class. as it is allowed, no compilation error is observed.

class parent_class;
  local bit [31:0] tmp_addr;
  
  function new(bit [31:0] r_addr);
    tmp_addr = r_addr + 10;
  endfunction

  function display();
    $display("tmp_addr = %0d",tmp_addr);
  endfunction
endclass

//   module
module encapsulation;
  initial begin
    parent_class p_c = new(5);
    p_c.display();
  end
endmodule

Simulator Output

Addr = 15

Click to execute on

Protected class members

In some use cases, it is required to access the class members only by the derived class’s, this can be done by prefixing the class members with the protected keyword.
Any violation could result in a compilation error.

Syntax:

protected integer x;

Protected Class members examples

Accessing a protected variable outside the class ( Not allowed )

In the below example, The protected variable declared inside the class is trying to access from outside the class by using object handle.
As the variable is declared as protected, which leads to a compilation error.

class parent_class;
  protected bit [31:0] tmp_addr;
  
  function new(bit [31:0] r_addr);
    tmp_addr = r_addr + 10;
  endfunction

  function display();
    $display("tmp_addr = %0d",tmp_addr);
  endfunction
endclass

class child_class extends parent_class;
  function new(bit [31:0] r_addr);
    super.new(r_addr);
  endfunction
  
  function void incr_addr();
    tmp_addr++;
  endfunction  
endclass

//   module
module encapsulation;
  initial begin
    parent_class p_c = new(5);
    child_class  c_c = new(10);
        
    // variable declared as protected cannot be accessed outside the class 
    p_c.tmp_addr = 10;
    p_c.display();
   
    c_c.incr_addr();  //Accessing protected variable in extended class
    c_c.display();
  end
endmodule

Simulator Output

Error- Illegal class variable access
testbench.sv,
Protected member 'tmp_addr' of class 'parent_class' is not visible to scope
'encapsulation'.

Click to execute on

Accessing a protected variable in the extended class ( allowed )

In the below example, The protected variable declared inside the class is being accessed inside the extended class. as it is allowed, no compilation error is observed.

class parent_class;
  protected bit [31:0] tmp_addr;
  
  function new(bit [31:0] r_addr);
    tmp_addr = r_addr + 10;
  endfunction

  function display();
    $display("tmp_addr = %0d",tmp_addr);
  endfunction
endclass

class child_class extends parent_class;
  function new(bit [31:0] r_addr);
    super.new(r_addr);
  endfunction
  
  function void incr_addr();
    tmp_addr++;
  endfunction  
endclass

//   module
module encapsulation;
  initial begin
    child_class  c_c = new(10);
    
    c_c.incr_addr();  //Accessing protected variable in extended class
    c_c.display();
  end
endmodule

Simulator Output

Addr = 21

Click to execute on

❮ Previous Next ❯

SystemVerilog Inline Constraints

Inline Constraints in SystemVerilog

Constraints will be written inside the class. inline constraint allows the user to add extra constraints to existing constraints written inside the class. inline constraints will be written outside the class i.e along with the randomize method call.
  • the inline constraint is written using with keyword
  • during randomization, constraint solver will consider both inline constraints and constraints written inside the class
  • the inline constraint will not override the constraints written inside the class
  • the inline constraint shouldn’t conflict with the constraint written inside the class, else it will lead to randomization failure
    • for example, constraint inside the class written as var < 5, and inline constraint written as var > 5

Inline constraint Syntax

object.randomize() with { .... };

Inline constraint examples

Only inline constraint

In the below example,
Class doesn’t have constraints defined in it. the inline constraint is used to constrain the variable addr.

class packet;
  rand bit [3:0] addr;
endclass

module inline_constr;
  initial begin
    packet pkt;
    pkt = new();

    repeat(2) begin
      pkt.randomize() with { addr == 8;};
      $display("\taddr = %0d",pkt.addr);
    end
  end
endmodule

Simulator Output

addr = 8
addr = 8

Click to execute on   

Constraint inside the class and inline constraint

In the below example,
addr and data are the two random variables. The constraint for data is written inside the class, and the inline constraint is written for addr.

Conclusion: Both class and inline constraints are considered during randomization.

class packet;
  rand bit [3:0] addr;
  rand bit [3:0] data;

  constraint data_range { data > 0;
                          data < 10; }
endclass

module inline_constr;
  initial begin
    packet pkt;
    pkt = new();
    repeat(2) begin
      pkt.randomize() with { addr == 8;};
      $display("\taddr = %0d data = %0d",pkt.addr,pkt.data);
    end
  end
endmodule

Simulator Output

addr = 8 data = 2
addr = 8 data = 5

Click to execute on   

Conflict with inline constraint

In the below example,
The addr is the random variable. constraint inside the class written as addr < 5, and inline constraint written as addr > 5.

Conclusion: Conflict between the class and inline constraints leads to randomization failure.

class packet;
  rand bit [3:0] addr;
  
  constraint addr_range {addr < 5;};
endclass

module inline_constr;
  initial begin
    packet pkt;
    pkt = new();
    repeat(2) begin
      pkt.randomize() with { addr > 5;};
      $display("\taddr = %0d",pkt.addr);
    end
  end
endmodule

Simulator Output

Error-[CNST-CIF] Constraints inconsistency failure
testbench.sv, 15
Constraints are inconsistent and cannot be solved.
Please check the inconsistent constraints being printed above and rewrite
them.
addr = 0
=======================================================
Solver failed when solving following set of constraints
rand bit[3:0] addr; // rand_mode = ON
constraint addr_range    // (from this) (constraint_mode = ON) (testbench.sv:7)
{
(addr < 4'h5);
}
constraint WITH_CONSTRAINT    // (from this) (constraint_mode = ON) (testbench.sv:15)
{
(addr > 4'h5);
}
=======================================================

Click to execute on   

Class and inline constraints for the same random variable

In the below example,
The addr is the random variable. constraint inside the class written as addr between 6:12, and inline constraint is written as addr == 8.

Conclusion: Constraint solver considers both class and inline constraints.

class packet;
  rand bit [3:0] addr;
  
  constraint addr_range {addr inside {[6:12]};};
endclass

module inline_constr;
  initial begin
    packet pkt;
    pkt = new();
    repeat(2) begin
      pkt.randomize() with { addr == 8;};
      $display("\taddr = %0d",pkt.addr);
    end
  end
endmodule

Simulator Output

addr = 8
addr = 8

Click to execute on   

❮ Previous Next ❯

SystemVerilog Bidirectional Constraints

Bidirectional Constraints

SystemVerilog constraints are solved bidirectionally, which means constraints on all random variables will be solved parallel.

Consider a constraint example,

constraint c_name { if(a == 0) b == 1;
                    else       b == 0; }

We see that ‘b’ is dependent on ‘a’.
but constraint solver see’s it as ‘a’ is dependent on ‘b’ and ‘b’ is dependent on ‘a’.
i.e if ‘b’ is inline constrained as ‘1’, in order to satisfy, ‘a’ should take the value ‘0’.

As constraints are considered from all the aspects, SystemVerilog constraints are called as bidirectional constraints.

Bidirectional constraint example

In the example below,

Value of a should be sum of b and c, b should be greater than 6 and c should be less than 8. so in this case constraint solver will choose a value to ‘a’ in such a way that it should be sum of b and c, also ‘b’ and ‘c’ should satisfies their constraint.

class packet;
  rand bit [3:0] a;
  rand bit [3:0] b;
  rand bit [3:0] c;

  constraint a_value { a == b + c; } 
  constraint b_value { b > 6; }
  constraint c_value { c < 8; }
endclass

module bidirectional_constr;
  initial begin
    packet pkt;
    pkt = new();
    repeat(5) begin
      pkt.randomize();
      $display("Value of a = %0d \tb = %0d \tc =%0d",pkt.a,pkt.b,pkt.c);
    end
  end
endmodule

Simulator Output

Value of a = 8 b = 8 c =0
Value of a = 0 b = 14 c =2
Value of a = 14 b = 14 c =0
Value of a = 6 b = 15 c =7
Value of a = 13 b = 11 c =2

Click to execute on   

Bidirectional constraint example 2

In below example,

Generation of value for b is depending on value of a.
i.e if(a == 0)  b = 1;

this condition can be re-written as,
if(b == 1)  a = 0;

but there is a constraint for ‘a’ that value for ‘a’ should be always ‘1’. so ‘b’ should not take value of ‘1’ (to satisfy constraint if(a == 0) b == 1;)

What if we make ‘b’ value as ‘1’ with inline constraint?
See the below example for the answer.

class packet;
  rand bit a;
  rand bit b;

  constraint a_value { a == 1; } 
  constraint b_value { if(a == 0) b == 1;
                       else       b == 0; }
endclass

module bidirectional_const;
  initial begin
    packet pkt;
    pkt = new();
    pkt.randomize() with { b == 1; };
    $display("Value of a = %0d \tb = %0d",pkt.a,pkt.b);
  end
endmodule

Simulator Output

Error-[CNST-CIF] Constraints inconsistency failure
testbench.sv, 18
Constraints are inconsistent and cannot be solved.
Please check the inconsistent constraints being printed above and rewrite
them.

Click to execute on   

❮ Previous Next ❯

SystemVerilog Solve Before constraints

Solve Before Constraints

Solve before is the constraint property. solve before is used inside the constraint block to specify the order of constraint solving. If the variables are dependent, due to the bidirectional nature of constraints value of one variable will influence the value of another variable.

  • solve before constraints are used to force the constraint solver to choose the order in which constraints are solved.
  • constraint solver will give equal weight-age to all the possible values. i.e On multiple randomization solver should assign all the possible values.
class pakcet;
  rand bit       a;
  rand bit [3:0] b;

  constraint a_b { (a == 1) -> b == 0; }
endclass

Possible value of,

a -> 0 and 1;  // 2 possible values
b -> 0 to  15; // 16 possible values

As ‘b’ value ranges 0:15, Probability of getting b == 0 is very less.
so it will impact the value of a,  i.e if value of b != 0, which will lead to value of ‘a’ to become ‘0’.

What if in some situations it is required to generate a value of ‘a’ to ‘1’ more frequently. by using ‘solve before’ it can be done.

Writing below constraint will direct solver to solve ‘a’ first, so more frequently a will take value of 1.

constraint sab { solve a before b;}

Solve before constraint example

without solve before

The below example is the example explained above,
this example is without solve before constraint, so we can see the simulation result that the occurrence of value a == 1 is less.

class packet;
  rand bit       a;
  rand bit [3:0] b;

  constraint a_b { (a == 1) -> b == 0; }
endclass

module inline_constr;
  initial begin
    packet pkt;
    pkt = new();
    repeat(10) begin
      pkt.randomize();
      $display("\tValue of a = %0d, b = %0d",pkt.a,pkt.b);
    end
  end
endmodule

Simulator Output

Value of a = 0, b = 6
Value of a = 0, b = 3
Value of a = 1, b = 0
Value of a = 0, b = 15
Value of a = 0, b = 7
Value of a = 0, b = 2
Value of a = 0, b = 15
Value of a = 0, b = 4
Value of a = 0, b = 7
Value of a = 0, b = 11

Click to execute on   

with solve before

this example is to solve before constraint, so we can see the simulation result that the occurrence of value a == 1 is more than without solve before constraint.

class packet;
  rand bit       a;
  rand bit [3:0] b;

  constraint sab { solve a before b;}
  constraint a_b { (a == 1) -> b == 0;}
endclass

module inline_constr;
  initial begin
    packet pkt;
    pkt = new();
    repeat(10) begin
      pkt.randomize();
      $display("\tValue of a = %0d, b = %0d",pkt.a,pkt.b);
    end
  end
endmodule

Simulator Output

Value of a = 0, b = 9
Value of a = 0, b = 14
Value of a = 0, b = 3
Value of a = 0, b = 13
Value of a = 1, b = 0
Value of a = 0, b = 5
Value of a = 0, b = 3
Value of a = 0, b = 4

Click to execute on   

❮ Previous Next ❯

SystemVerilog Scheduling Semantics

SystemVerilog event regions

This section gives an overview of the interactions and behavior of SystemVerilog elements, especially with respect to the scheduling and execution of events.

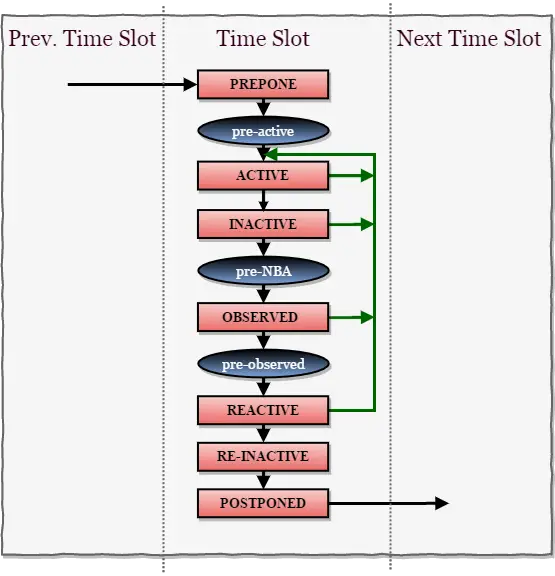
Updates to IEEE STD 1800-20051 divide the SystemVerilog time slot into 17 ordered regions, nine ordered regions for the execution of SystemVerilog statements and eight ordered regions for the execution of PLI code. The purpose of dividing a time slot into these ordered regions is to provide predictable interactions between the design and testbench code.

Use of Event scheduling

Every change in the state of a net or variable in the system description being simulated is considered an update event. When an update event is executed, all the processes that are sensitive to those events are considered for evaluation known as an evaluation event.

Examples of processes include, initial, always, always_comb, always_latch, and always_ff procedural blocks, continuous assignments, asynchronous tasks, and procedural assignment statements.

A single time slot is divided into multiple regions where events can be scheduled. This event scheduling supports obtaining clear and predictable interactions that provide for the ordering of particular types of execution.

This allows properties and checkers to sample data when the design under test is in a stable state. Property expressions can be safely evaluated, and testbenches can react to both properties and checkers with zero delay, all in a predictable manner.

This same mechanism also allows for non-zero delays in the design, clock propagation, and/or stimulus and response code to be mixed freely and consistently with cycle-accurate descriptions.

Note:

  1. The term simulation time is used to refer to the time value maintained by the simulator to model the actual time it would take for the system description being simulated.
  2. A time slot includes all simulation activity that is processed in the event regions for each simulation time SystemVerilog event Regions The new SystemVerilog event regions are developed to support new SystemVerilog constructs and also to prevent race conditions being created between the RTL design and the new verification constructs.
SystemVerilog Scheduling Semantics

These new regions guarantee predictability and consistency between design, testbenches, and assertions

Preponed region

The values of variables that are used in concurrent assertions are sampled in the Preponed region. (Evaluation is done at observed region). Preponed region is executed only once in each time slot, immediately after advancing simulation time.

Pre-active region

The Pre-active region is specifically for a PLI callback control point that allows for user code to read and write values and create events before events in the Active region are evaluated

Active region

The Active region holds current events being evaluated and can be processed in any order.

  • Execute all module blocking assignments.
  • Evaluate the Right-Hand-Side (RHS) of all nonblocking assignments and schedule updates into the NBA region.
  • Execute all module continuous assignments
  • Evaluate inputs and update outputs of Verilog primitives.
  • Execute the $display and $finish commands

Inactive region

The Inactive region holds the events to be evaluated after all the active events are processed. In this region #0 blocking assignments are scheduled.

Pre-NBA region

The Pre-NBA region is specifically for a PLI callback control point that allows for user code to read and write values and create events before the events in the NBA region are evaluated

Non-blocking Assignment Events region (NBA)

The principal function of this region is to execute the updates to the Left-Hand-Side (LHS) variables that were scheduled in the Active region for all currently executing nonblocking assignments.

Post-NBA region

The Post-NBA region is specifically for a PLI callback control point that allows for user code to read and write values and create events after the events in the NBA region are evaluated

Observed region

The principal function of this region is to evaluate the concurrent assertions using the values sampled in the Preponed region. A criterion behind this decision is that the property evaluations must only occur once in any clock triggering time slot. During the property evaluation, the pass/fail code shall be scheduled in the Reactive region of the current time slot.

Post-observed region

The Post-observed region is specifically for a PLI callback control point that allows for user code to read values after properties are evaluated (in Observed or earlier region).

Reactive region

The code specified in the program block, and pass/fail code from property expressions, are scheduled in the Reactive region. The principal function of this region is to evaluate and execute all current program activity in any order

  • Execute all program blocking assignments.
  • Execute the pass/fail code from concurrent assertions.
  • Evaluate the Right-Hand-Side (RHS) of all program nonblocking assignments and schedule
  • Execute all program continuous assignments
  • Execute the $exit and implicit $exit commands

Re-Inactive Events region

In this region #0 blocking assignments in a program process are scheduled.

Postponed Region

The principal function of this region is to execute the $strobe and $monitor commands that will show the final updated values for the current time slot. This region is also used to collect functional coverage for items that use strobe sampling.
❮ Previous Next ❯